
Table of Contents
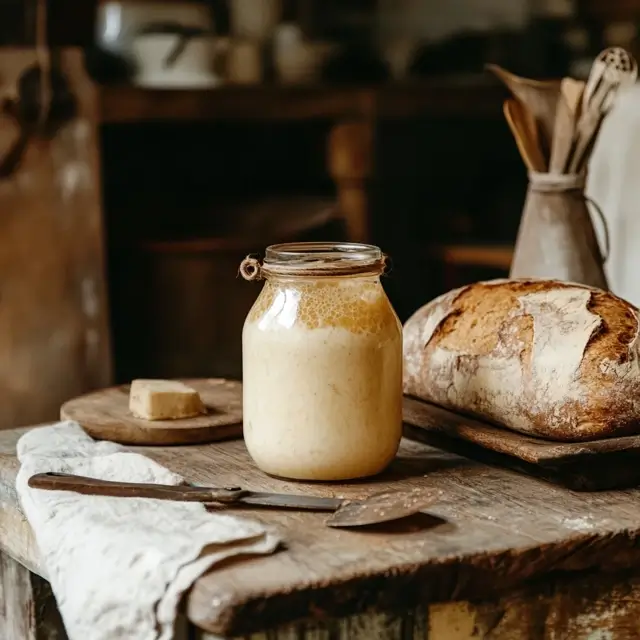
The biggest mistake with your sourdough starter
Is neglecting its regular care, which can lead to issues like mold, inactivity, or overly acidic smells. This common error often happens when bakers overlook the importance of consistent feeding and proper storage. Thankfully, avoiding this mistake is easier than you think with a few practical tips. Let’s explore how to keep your starter healthy and ready for perfect sourdough bread every time.
Common Mistakes With Sourdough Starters

Forgetting to Feed Your Starter on Time
Feeding your starter is like refueling a car. If you skip it, your starter loses its vitality. Over time, it can become inactive, sluggish, or even start smelling unpleasantly sour.
- Tip: Establish a feeding routine that works with your schedule. Most starters thrive on a daily or every-other-day feeding plan.
Using Non-Filtered or Chlorinated Water
The quality of water can make or break your sourdough starter. Chlorinated water can inhibit the growth of beneficial bacteria and yeast, leading to a weak starter.
- Solution: Use filtered, spring, or distilled water for optimal results.
Keeping Your Starter in the Wrong Environment
Starters love a warm, cozy spot but can’t handle extreme conditions. Too cold, and it slows down. Too hot, and it could die.
- Tip: Keep your starter at room temperature (around 70-75°F). If you live in a hot climate, consider refrigerating it between feedings.
The Absolute Biggest Mistake With Your Sourdough Starter
Ignoring Regular Maintenance and Care
Sourdough starters thrive on consistency. The biggest mistake? Letting your starter sit untouched for weeks or even months. When you ignore your starter, it can develop an overgrowth of hooch (a liquid layer), mold, or unpleasant smells—all signs it’s struggling.
- Why Neglect Is a Problem:
- Neglected starters often develop imbalances in their microbial communities.
- They may lose their rising power, resulting in flat and dense bread.
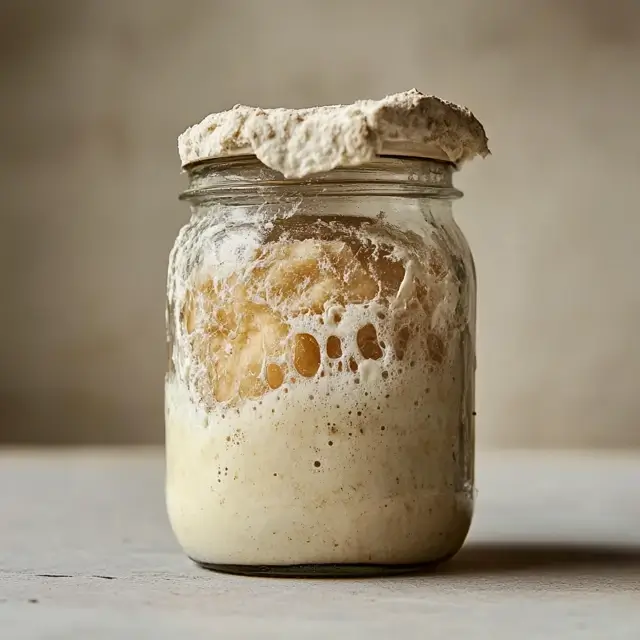
Signs of a Neglected Starter
- A strong, off-putting smell (like nail polish remover).
- A dark liquid on top (called hooch).
- Mold growth around the edges of the jar.
Block Quote: “A sourdough starter is like a friendship. Neglect it, and it’ll stop supporting you!”
How to Revive a Neglected Starter?
- Discard most of the starter, leaving about 1-2 tablespoons.
- Feed it with equal parts flour and water.
- Repeat this process every 12 hours until it regains its bubbles and vigor.
How to Fix Mistakes With Your Sourdough Starter?
Even seasoned bakers run into issues with their sourdough starters. The good news? Most problems can be solved with a bit of care and attention. Let’s dive into practical solutions for common mistakes, ensuring your starter gets back on track.
Steps to Revive a Neglected Starter
If your sourdough starter looks like it’s seen better days, don’t panic. Follow these steps to bring it back to life:
- Assess the Situation:
- If you notice hooch (the dark liquid on top), pour it off. Hooch is a sign your starter is hungry.
- If there’s mold, discard the entire starter and start fresh. Mold is a dealbreaker for safety.
- Start Small:
- Keep just 1-2 tablespoons of the starter. This reduces the chance of contamination while giving the microbes more room to grow.
- Feed Consistently:
- Combine equal parts flour and filtered water (by weight) with your remaining starter.
- Repeat the feeding process every 12 hours until you see bubbles and a pleasant, tangy aroma.
- Monitor Progress:
- Within 2-3 days, your starter should bounce back, becoming active and bubbly.
Block Quote: “Reviving a sourdough starter is like nursing a plant back to health—patience and care make all the difference!”
Dealing With Mold and Contamination
Mold is the nightmare of sourdough enthusiasts. It usually happens when a starter is left untouched for too long in a warm, humid environment.
- Solution: Unfortunately, if mold appears, the safest option is to start over. Mold spores can spread throughout the starter, making it unsafe to use.
- Prevention Tips:
- Always keep your jar clean and use a lid or cloth that allows airflow while protecting it from contaminants.
- Feed your starter regularly to keep it active and resistant to bad bacteria.
Preventing Acidity Problems in the Future
An overly acidic starter can result in bread that’s too tangy or dense. This usually happens when a starter is underfed or left in a warm environment for too long.
- Quick Fix: Feed your starter more frequently, and consider using a lower hydration ratio (more flour than water) to balance acidity.
- Pro Tip: If your starter smells like vinegar or nail polish remover, it’s time for extra feedings to dilute the acids.
Proven Tips to Keep Your Sourdough Starter Healthy
Establishing a Simple Feeding Routine
Consistency is key to a thriving sourdough starter. Think of it as a living pet—it needs regular meals to stay happy.
- Daily Feeding Schedule: Feed your starter once every 24 hours at room temperature.
- For Refrigerated Starters: Feed it weekly to keep it in hibernation mode.
Understanding the Right Flour-to-Water Ratio
Starters thrive best when the flour-to-water ratio is balanced. Most recipes recommend a 1:1:1 ratio by weight (starter:flour:water).
- Experiment With Flours: Whole wheat or rye flours can jumpstart microbial activity due to their higher nutrient content.
Proper Storage Techniques for Busy Bakers
If you’re not baking often, storing your starter in the refrigerator can reduce maintenance.
- How to Store It:
- Transfer your starter to a clean jar and seal it loosely.
- Feed it before placing it in the fridge to ensure it has enough food.
- When to Take It Out:
- Remove the starter from the fridge a day or two before baking.
- Feed it twice daily to wake it up and get it bubbly.
Block Quote: “A well-maintained sourdough starter is a baker’s best friend, always ready to create magic in the kitchen! 🍞”
What Happens When You Avoid Sourdough Starter Mistakes?
Caring for your sourdough starter pays off in more ways than one. A healthy starter not only simplifies the baking process but also enhances the flavor and texture of your bread. Let’s explore the rewards of avoiding common mistakes and maintaining your starter with care.
Baking Perfect Bread Every Time
A thriving sourdough starter ensures consistent results in your baking adventures. It produces loaves with excellent rise, a chewy crumb, and that signature tangy flavor sourdough enthusiasts love.
- Benefits of a Healthy Starter:
- Better leavening, resulting in airy bread with a lovely crust.
- Predictable fermentation times, making it easier to plan your baking schedule.
- Balanced flavor profiles without overly acidic or bland notes.
Pro Tip: Use your starter at its peak activity (when it’s bubbly and has doubled in size) for the best results.
Enjoying the Versatility of Your Starter
Did you know your sourdough starter isn’t just for bread? When it’s healthy and active, you can use it for a variety of recipes beyond traditional loaves.
- Creative Uses for Your Starter:
- Pancakes and waffles
- Crackers and flatbreads
- Pizza dough
- Cookies and muffins
By avoiding mistakes, you unlock endless culinary possibilities. Your starter becomes a multi-purpose tool that elevates everyday recipes with its unique flavor.
Sharing and Preserving Your Starter for Generations
One of the most rewarding aspects of maintaining a healthy sourdough starter is sharing it with others. Starters can be passed down like heirlooms, creating a legacy of delicious baking.
- How to Share Your Starter:
- Portion out a few tablespoons of your active starter into a small container.
- Include instructions for feeding and maintaining it.
- Long-Term Preservation:
- Dry your starter into flakes and store it in an airtight container for months (or even years) of shelf life.
- Revive it by rehydrating and feeding it as needed.
Block Quote: “A well-loved sourdough starter can outlive its baker, carrying stories and flavors across generations. 🥖”
Frequently Asked Questions About Sourdough Starter Mistakes
1. Can I Bring Back a Starter Left Untouched for Weeks?
Yes, most neglected starters can be revived with consistent feeding. Discard most of the starter, feed it twice daily, and monitor its progress. If it smells off or shows signs of mold, it’s safer to start fresh.
2. What’s the Best Flour for Maintaining a Starter?
Unbleached all-purpose flour works well for most starters. For an extra boost, use whole wheat or rye flour occasionally, as they contain more nutrients that help your starter thrive.
3. How Often Should I Feed My Starter?
The feeding schedule depends on how you store your starter:
- Room temperature: Feed every 24 hours.
- Refrigeration: Feed weekly, or the day before baking to wake it up.
4. Why Does My Starter Smell So Strong?
This is a sign of excess acidity caused by infrequent feedings. Feed your starter more often, and adjust the flour-to-water ratio if needed.
5. How Do I Prevent Mold From Forming in My Starter?
Keep your starter in a clean jar with proper ventilation. Feed it regularly, and use filtered water to minimize contamination.
6. What Should I Do If My Starter Stops Bubbling?
A weak or inactive starter can be revived by increasing feedings and switching to whole wheat or rye flour for a few days. Ensure it’s stored in a warm spot (70-75°F) to encourage activity.
The Importance of Patience in Sourdough Bread Making
When it comes to sourdough bread, patience isn’t just a virtue—it’s the secret ingredient. Rushing the process is one of the biggest mistakes bakers make, leading to dense, underdeveloped loaves. Great sourdough bread relies on long fermentation periods, which allow the natural yeast and bacteria in the sourdough starter to work their magic. This extended fermentation develops the dough’s complex flavors, gives it a lighter crumb, and creates the iconic tangy taste that sets sourdough apart.
Timing plays a key role in every step of the process:
- Bulk Fermentation: Letting the dough rest long enough during this stage allows it to rise and develop structure.
- Proofing: The final proof gives the dough its airiness, but overproofing can cause it to collapse.
- Baking: Waiting for the perfect dough rise before placing it in the oven ensures an impressive crust and crumb.
Block Quote: “Patience is the soul of sourdough bread. Slow fermentation unlocks the deep, tangy flavors bakers dream of.”
If you’re ever tempted to speed things up, remember: sourdough baking is like a slow dance with nature. By allowing time to do its work, you’ll transform a simple mixture of flour, water, and salt into something truly extraordinary.
The Role of Fermentation in Unlocking the Secret to Good Sourdough Bread
Fermentation is at the heart of sourdough bread making, and understanding it is crucial to mastering the process. Unlike commercial yeast bread, sourdough relies on a natural fermentation process driven by the wild yeast and lactic acid bacteria in your starter. These microbes not only help the dough rise but also create the depth of flavor that makes sourdough unique.
During fermentation, the microbes break down the starches in the flour, producing carbon dioxide that creates air pockets in the dough. This process also enhances digestibility by breaking down gluten and phytic acid, making sourdough bread gentler on the stomach compared to regular bread.
- Optimal Fermentation Time: Sourdough bread requires a slow, extended fermentation. On average, bulk fermentation can take anywhere from 4 to 12 hours, depending on the temperature and the strength of your starter.
- Temperature’s Role: Warmer temperatures (around 75-80°F) speed up fermentation, while cooler conditions slow it down. A balance between time and temperature is essential to achieve a perfect loaf.
Pro Tip: To improve flavor, try a cold fermentation in the refrigerator. This slows down the process and allows the flavors to develop even further.
The beauty of fermentation lies in its unpredictability—no two loaves are ever exactly the same. By giving your dough enough time to ferment, you let the natural processes work their magic, resulting in bread that’s airy, flavorful, and perfectly sour.
The Science of Scoring and Baking Perfect Sourdough
Once fermentation is complete, scoring and baking are the final steps that take your sourdough from dough to delicious bread. Scoring isn’t just for aesthetics; it serves an important purpose. By slashing the dough before baking, you give it space to expand in the oven. Without scoring, the bread might burst unpredictably, leading to uneven shapes.
How to Master Scoring:
- Use a sharp blade, such as a bread lame, to make quick, clean cuts.
- Experiment with patterns. Functional scores, like a single slash down the middle, direct the dough’s expansion. Decorative scores add artistic flair.
- Angle your blade slightly to create an “ear”—that crispy ridge on the crust that bakers prize.
The Oven Spring Secret:
The magic happens in the oven, where the dough experiences a phenomenon called “oven spring.” When exposed to high heat, the trapped carbon dioxide expands, causing the bread to rise dramatically. A hot, steamy oven is crucial to achieving this effect.
Pro Tip: Bake your sourdough at a high temperature (450-475°F) and use steam during the first 15-20 minutes to create a glossy, crispy crust.
The secret to good sourdough bread lies not only in the dough itself but also in how you finish it. Perfect scoring and baking techniques can elevate your loaf from homemade to bakery-worthy.
Why Hydration Matters in Sourdough Baking
Hydration refers to the ratio of water to flour in your dough, and it’s a critical factor in determining the texture, flavor, and structure of your bread. High-hydration doughs (those with more water) produce open crumbs with large holes, while lower hydration results in denser, tighter crumbs.
Finding the Right Hydration Level
- Beginners may want to start with a hydration level of 65-70%, as higher hydration doughs can be tricky to handle.
- Advanced bakers often work with 75-80% hydration for that sought-after airy texture.
- Hydration also depends on your flour type. Whole wheat and rye flours absorb more water, so adjust accordingly.
Tips for Handling High-Hydration Dough
Working with wet dough can be intimidating, but practice makes perfect:
- Use the “stretch and fold” technique instead of traditional kneading to develop gluten strength.
- Keep your hands and work surface lightly damp to prevent sticking.
- Embrace the mess—it’s part of the process!
Fun Fact: The hydration level of sourdough bread influences its crust as well. Higher hydration loaves often have a thinner, crispier crust, while lower hydration loaves produce a thicker, chewier crust.
By understanding and mastering hydration, you gain better control over your dough and can customize your bread to suit your preferences.
Experimenting With Sourdough Flavors
One of the joys of sourdough baking is the opportunity to experiment with flavors. While a classic loaf made with just flour, water, salt, and starter is timeless, there’s no limit to the ingredients you can add to create unique variations.
Creative Add-Ins:
- Seeds and Nuts: Sunflower seeds, sesame seeds, walnuts, or pumpkin seeds add texture and earthy flavors.
- Dried Fruits: Raisins, cranberries, or figs bring natural sweetness and pair beautifully with whole grain sourdough.
- Herbs and Spices: Rosemary, thyme, garlic, or cinnamon can transform your loaf into a savory or sweet delight.
Experiment With Flour Blends:
Try blending different flours to enhance the flavor and nutritional value of your bread. Whole wheat, rye, spelt, and even einkorn flour can add complexity and depth.
Pro Tip: Keep a journal of your experiments, noting the ingredients, methods, and results. This helps you refine your process and discover your signature loaf.
Adding your own twist to sourdough bread makes the process even more rewarding. Not only do you create something delicious, but you also put your unique stamp on every loaf.
Sourdough Bread as a Lifestyle
Baking sourdough bread isn’t just about the end product—it’s about embracing a way of life that values patience, tradition, and creativity. Each step, from feeding your starter to shaping the dough, connects you to centuries of baking history. It’s also a meditative process that teaches valuable lessons in mindfulness and perseverance.
Why Sourdough Is Worth the Effort:
- Health Benefits: The long fermentation process makes sourdough easier to digest and improves nutrient absorption.
- Community: Sharing sourdough tips, starters, and recipes with friends and family fosters connections.
- Sustainability: Baking sourdough at home reduces reliance on store-bought bread, cutting down on packaging waste.
Block Quote: “Sourdough isn’t just bread—it’s a journey. Each loaf tells a story of time, care, and creativity. 🥖”
By making sourdough a part of your routine, you’ll discover that the process is just as satisfying as the results.
Avoiding the biggest mistake with your sourdough starter—neglect—is the key to enjoying consistent, delicious bread and other baked goods. By maintaining a regular feeding schedule, using quality ingredients, and storing your starter properly, you ensure its health and longevity. Remember, your starter is more than just an ingredient; it’s a living, breathing part of your baking journey.
Ready to create incredible sourdough recipes? Start by caring for your starter—it’s worth every effort!
Banana Bread Recipe: 5 Game-Changing Secrets for the Best Flavor! – While not sourdough, banana bread is a popular homemade bread that can offer insights into fermentation and baking techniques.